Learn how to diagnose, test, and replace a fuel rail pressure sensor with a detailed fuel rail pressure sensor diagram. Essential tips for Common Rail Diesel and Direct Injection petrol engine technicians. When it comes to maintaining and repairing modern engines, one crucial component that often requires attention is the fuel rail pressure sensor. Whether you’re dealing with a Common Rail Diesel engine or a Direct Injection petrol engine, understanding the fuel rail pressure sensor is essential. This guide will delve into the intricacies of diagnosing, testing, and replacing the fuel rail pressure sensor, with a special focus on the “fuel rail pressure sensor diagram.”
Having worked on numerous vehicles over the years, I’ve seen firsthand how a malfunctioning fuel rail pressure sensor can lead to various engine performance issues. From poor fuel efficiency to rough idling and even engine stalling, the sensor plays a pivotal role in ensuring your engine runs smoothly. For technicians, knowing how to accurately diagnose and test this sensor can save a lot of time and prevent unnecessary part replacements.
In this article, we’ll explore the key aspects that every technician needs to know about the fuel rail pressure sensor. We’ll start with the basics of how these sensors function in both diesel and petrol engines, followed by a detailed explanation of the diagnostic process.
Additionally, we will provide a comprehensive fuel rail pressure sensor diagram to aid in visualizing its components and connections. Finally, we’ll cover the steps required for testing and replacing the sensor, ensuring you have all the information needed to tackle this task with confidence.
Table of Contents
How does the Fuel rail pressure sensor work?
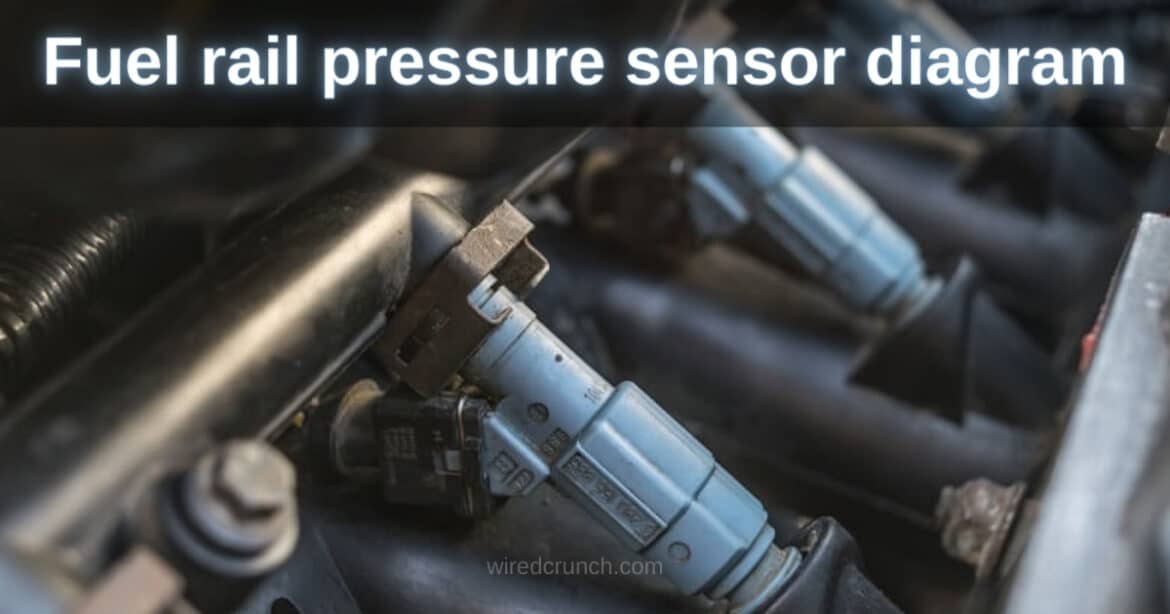
The Fuel Rail Pressure Sensor (RPS) is used on Common Rail Diesel and Direct Injection Petrol engines to measure the pressure in the fuel rail and send this information to the vehicle’s Powertrain Control Module (PCM). Mounted near the injectors, this sensor ensures that the fuel pressure remains at the correct level. When the pressure drops, the sensor signals the PCM, which then instructs the high-pressure pump to increase fuel output and adjust the injector pulse width. This process happens thousands of times per second to maintain fuel economy and reduce emissions.
The RPS is a diaphragm strain gauge device, and changes in pressure alter its resistance, providing an electrical signal to the PCM.
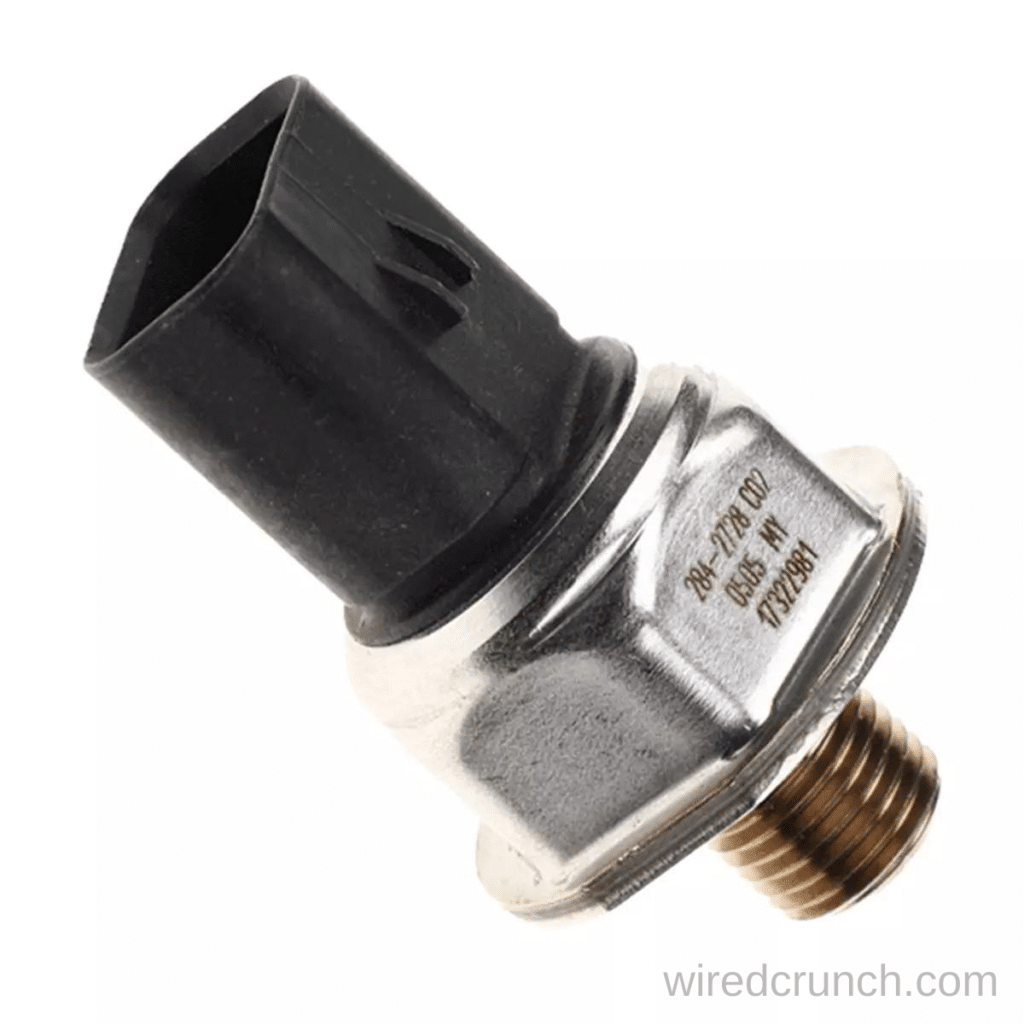
Typical location for Fuel rail pressure sensor
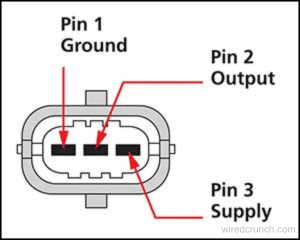
A fuel rail pressure sensor is located on the fuel rail (PCM-operated rail regulating device located on the delivery pump)
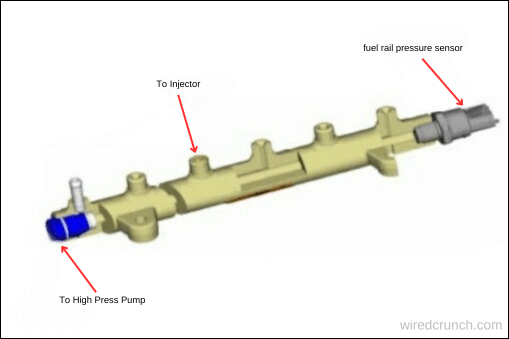
Note: The image above shows that the sensor is positioned at one end of the CRD fuel rail. In some earlier and later CRD systems, a PCM-controlled pressure regulating device is used at the other end of the fuel rail.
Function of the CRD Sensor
The fuel rail pressure sensor (FRS) is a key part of your car’s fuel system. It’s usually a piezoresistive type sensor that measures the fuel pressure in the fuel rail. This measurement is sent as a changing voltage to the PCM (Powertrain Control Module). The PCM uses this information to calculate the duty cycle control for the Rail Pressure Control Solenoid, Fuel Metering Solenoid, or Suction Control Valve. This helps maintain the right fuel pressure for all driving conditions. In modern CRD systems, the pressure can reach over 200 MPa.
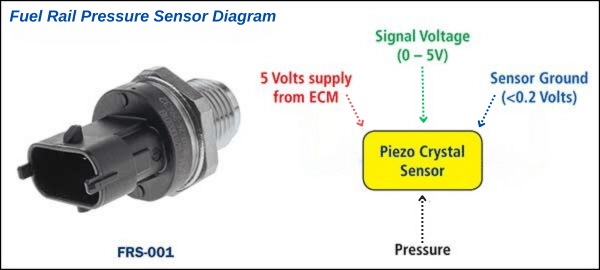
Fuel Rail Pressure Sensor Diagram Explanation
Symptoms of Fuel Rail Pressure Sensor on a vehicle
Here are the detailed symptoms of a faulty fuel rail pressure sensor:
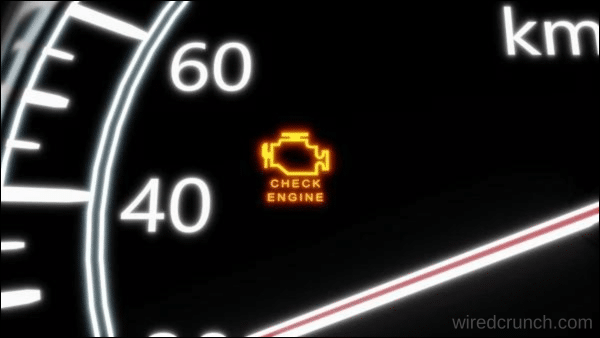
Warning light illuminated
An incorrect fuel pressure signal for the driving condition will trigger the warning light and usually log fault codes.
Note: There can be multiple reasons for an incorrect fuel pressure signal. The technician’s job is to find out if the problem is caused by the fuel supply and regulating system or if it is a sensor fault.
Delayed or difficult engine start
Without accurate rail pressure signals, the PCM cannot control the rail pressure correctly, leading to starting problems.
Poor acceleration
During acceleration, the rail pressure should quickly rise to ensure the injectors deliver the correct amount of fuel. However, if the rail pressure is not monitored correctly, this pressure increase may not happen.
Engine stalling
This can happen due to rail pressure fluctuations or having too low or too high pressure for the driving conditions.
Poor fuel economy
Inconsistent rail pressure leads to incorrect fuel mixtures, causing increased fuel consumption and significant variations in emission levels.
Checking the fuel rail pressure sensor with a multimeter
Here’s how to test the fuel rail pressure sensor with a multimeter in one-liner bullet points:
- Safety First: Ensure the vehicle is safely parked, the engine is off, and the ignition key is removed.
- Locate the Sensor: Find the fuel rail pressure sensor, usually on or near the fuel rail.
- Disconnect the Electrical Connector: Unplug the electrical connector from the sensor.
- Set Multimeter: Set the multimeter to measure resistance (ohms).
- Measure Resistance: Connect one multimeter probe to each of the sensor’s terminals.
- Check Resistance: Compare the reading to the specifications in the vehicle’s service manual; it should be within the specified range.
- Inspect Wiring and Connector: Make sure the wiring and connectors are in good condition and securely connected.
- Reconnect: Plug the sensor’s electrical connector back in.
- Clear Error Codes: If needed, clear any error codes using a diagnostic scanner.
- Test Drive: Take the vehicle for a test drive to see if the issue persists.
Caution: If you need to replace the FRS, make sure to follow all relevant safety procedures, as the fuel rail pressure can be very high.
Error Codes
Two common error codes related to fuel rail sensors on a CRD are:
- P0193 – Fuel Rail Sensor Circuit High Input. The PCM has detected that the fuel pressure is outside the predetermined range.
- P0087 – Fuel Rail Pressure Too Low. This typically indicates a problem with the fuel delivery system, causing the pressure to be too low.
Although GDI (Gasoline Direct Injection) rail pressures differ from CRD systems, the function of the rail pressure sensor is similar.
Fuel rail pressure sensor voltage
Typical signal voltages from the rail pressure sensor:
- Engine stationery: approximately 0.5 volts.
- Engine idling: approximately 1.32 volts.
- Snap acceleration: approximately 3.77 volts or higher.
Replacing the fuel rail pressure sensor step-by-step
If your car has trouble starting, or if the engine sputters and misfires, it could mean the fuel rail pressure sensor needs replacement. Follow these steps.
Tools and Materials Needed
- New fuel pressure sensor (if needed)
- Wrench or socket set
- Diagnostic scanner (optional)
- Multimeter (optional)
- Safety gear (gloves, eye protection)
Preparing for the Replacement Process
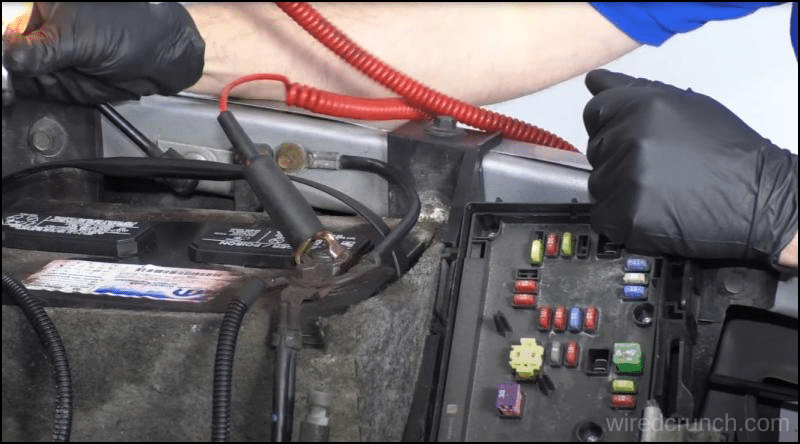
Before you begin replacing the sensor, ensure your vehicle is parked on a solid surface. For automatic vehicles, put the transmission in a park; for manual vehicles, use first gear. To preserve your vehicle’s settings, use a nine-volt battery saver plugged into the cigarette lighter. Open the hood and disconnect the battery by removing the cable from the negative post. If there are components obstructing access to the fuel rail sensor, remove the engine cover and any brackets in your way.
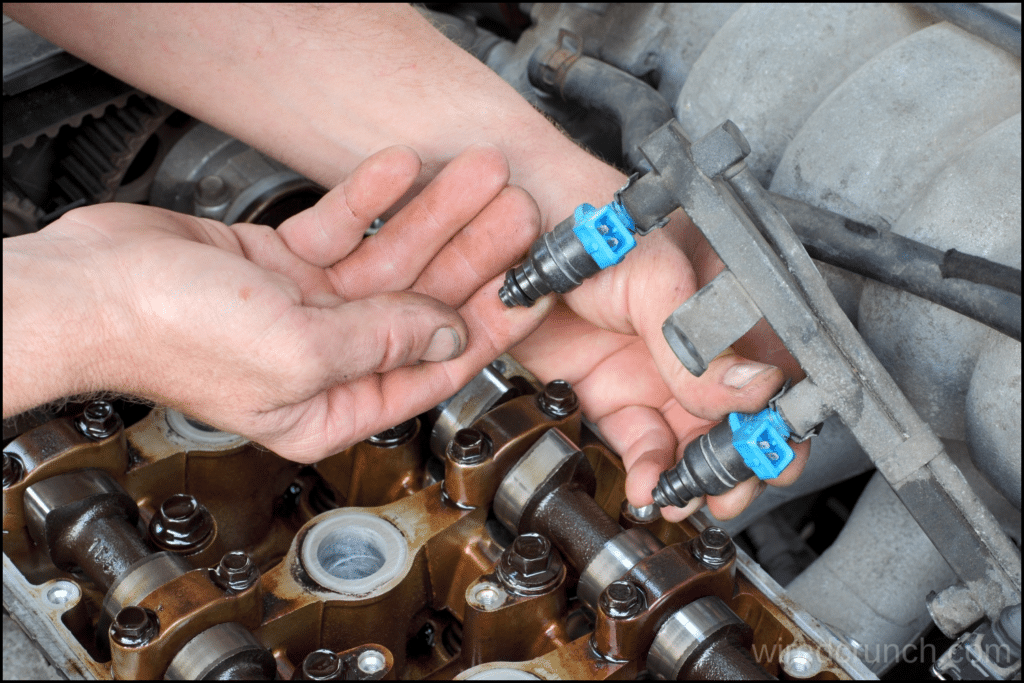
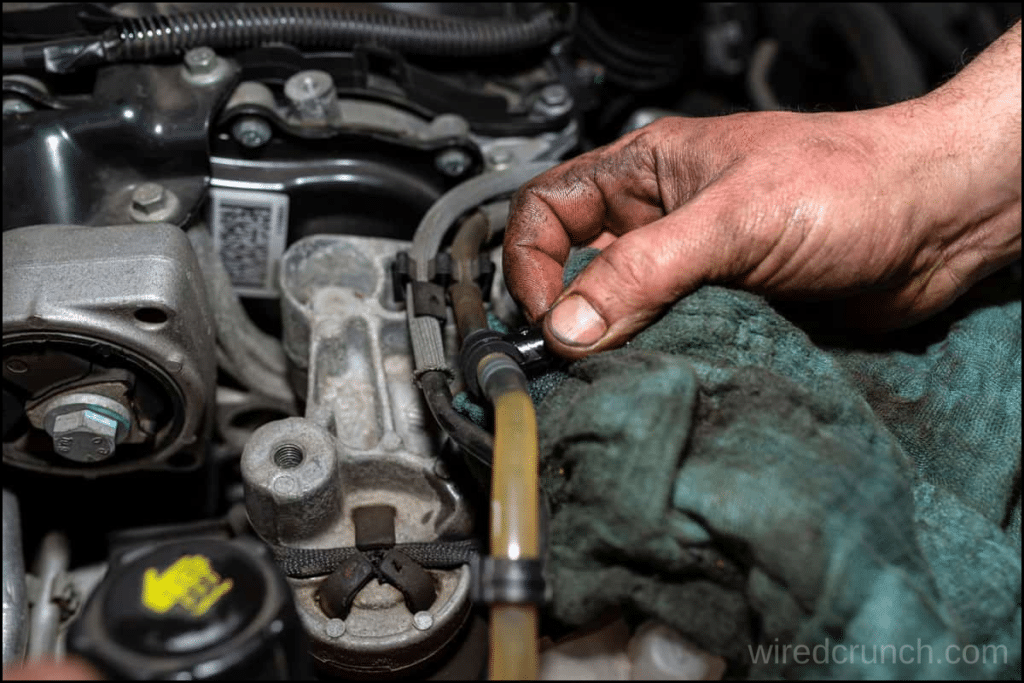
Removing the Old Fuel Rail Sensor
To begin removing the fuel rail pressure sensor, locate the Schrader valve or test port on the fuel rail. If your vehicle has a test port or Schrader valve, gently open it with a screwdriver to release the pressure in the fuel rail. If your vehicle lacks a test port, use a fuel hose quick disconnect tool kit to disconnect the fuel hose from the fuel rail and relieve the pressure. After releasing the pressure, unplug the harness connected to the fuel rail sensor. Finally, remove any mounting hardware to detach the sensor from the fuel rail.
Cleaning and Installing the New Fuel Rail Sensor
Before installing the new fuel rail pressure sensor, clean the fuel rail thoroughly with a lint-free cloth to remove any dirt or particles. Use a cleaner to clean the fuel rail sensor harness as well. Securely attach the sensor to the fuel rail following the specified torque specifications. Reconnect the fuel rail sensor harness and reinstall any brackets or components that were removed during the removal process. If the fuel line is disconnected, ensure it is reconnected correctly and securely fastened.
Checking for Leaks
After completing the installation, it’s crucial to check for fuel leaks. Reattach and securely tighten the ground cable to the battery post. Turn the ignition key to the “on” position and listen for the fuel pump activation. Cycle the ignition key on and off several times to fully pressurize the fuel rail. Use a gas detector to inspect all connections for leaks and carefully sniff around for any fuel odors in the air. If you detect any leaks, address them promptly to prevent potential issues.
Test Driving the Vehicle
Once you’ve confirmed there are no fuel leaks, take your vehicle for a test drive around the neighborhood. Pay close attention to the engine performance, listening for any unusual sounds or vibrations. Monitor the fuel gauge on the dashboard and watch for any warning lights. If the engine light illuminates after replacing the fuel rail sensor, further investigation into the fuel system or electrical issues may be necessary.
Conclusion
Understanding and maintaining the fuel rail pressure sensor is crucial for optimal engine performance and fuel efficiency. Referencing a fuel rail pressure sensor diagram can aid in correctly diagnosing and replacing components as needed, ensuring the smooth operation of your vehicle’s fuel system.
Frequently Asked Questions (FAQs)
What is the fuel rail pressure sensor circuit?
The fuel rail pressure sensor keeps the powertrain control module (PCM) aware of the pressure levels in the fuel rail so that the computer knows how much fuel the engine needs. When the PCM receives an irrational signal from the fuel rail pressure sensor, the module logs the P0191 code.
Can I drive without a fuel rail pressure sensor?
Assuming you can get the engine to start and keep it from dying, it’s possible to continue driving your vehicle despite the fuel rail pressure sensor’s failure. However, running lean or rich will cause more serious engine problems in the future, so you should only do this in an emergency for a short time.
What is the normal range of fuel rail pressure?
The components serve distinct functions: the pump pressurizes the fuel from about 3-4 bar (40-60 psi) to between 100-300 bar (1500-4500 psi).
What type of sensor is a fuel rail pressure sensor?
The sensor is an analog resistance strain gauge-type sensor with a typical output range of 5 volts.
How does a fuel rail pressure sensor work?
A fuel rail pressure sensor is a critical component in modern fuel injection systems in vehicles. It is responsible for measuring the pressure of the fuel in the fuel rail, which is the pipe that delivers fuel to the fuel injectors. The fuel rail pressure sensor provides real-time feedback to the engine control unit (ECU) so that it can adjust the fuel delivery to the engine for optimal performance and efficiency.
READ MORE :
How to Bypass dpf Pressure Sensor
I have a professional background with a Diploma in Information Communication Technology, which brings a blend of technical expertise and creative flair to my writing. Currently, I serve as a writer for Creativeoutrank LLC and contribute to their various websites.
I’m writing is a ref... Read more