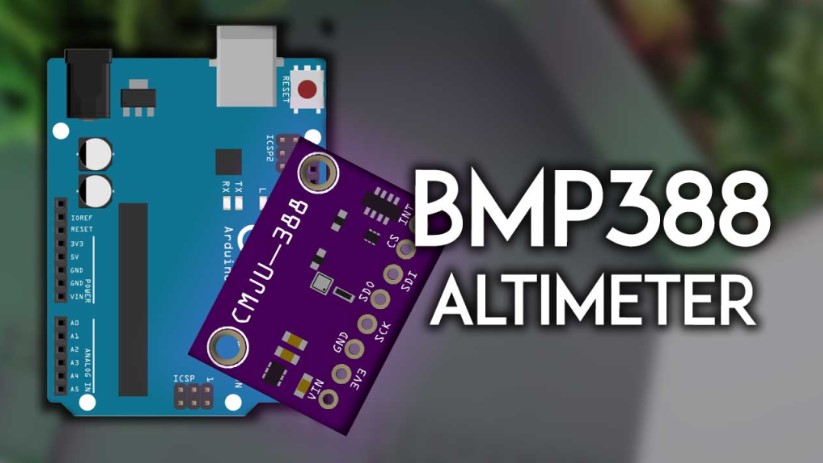
Things to know about BMP388 Altimeter with Arduino
BMP388 is known to be a small and accurate atmospheric pressure sensor. Since it’s an accurate barometric pressure sensor, we use it to calculate altitude in drone applications. Moreover, we can use it for indoor/outdoor navigation, PS applications, and others. In this tutorial, we will discuss in detail how to use the BMP388 altimeter/pressure sensor with the Arduino board along with a wiring diagram and example sketch. in this tutorial, you have all the Things to know about BMP388 Altimeter with Arduino.
This tutorial is mainly about,
- BMP388 pinout
- Wiring BMP388 with Arduino
- Getting BMP388 Pressure, Altitude, and Temperature.
Introducing BMP388 Barometric Sensor
The BMP388 barometric pressure sensor shows you the accurate pressure and temperature with its low power and low noise. As we know pressure changes with altitude, and this will help you to calculate the most accurate altitude. Because of that, it’s best for drone and navigation applications. Not only that you can use this for other applications such as;
- Vertical velocity calculations
- Internet
- Weather forecast and weather stations
- Health care applications
- Fitness applications and many more…
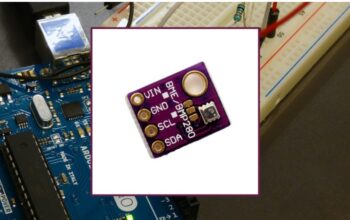
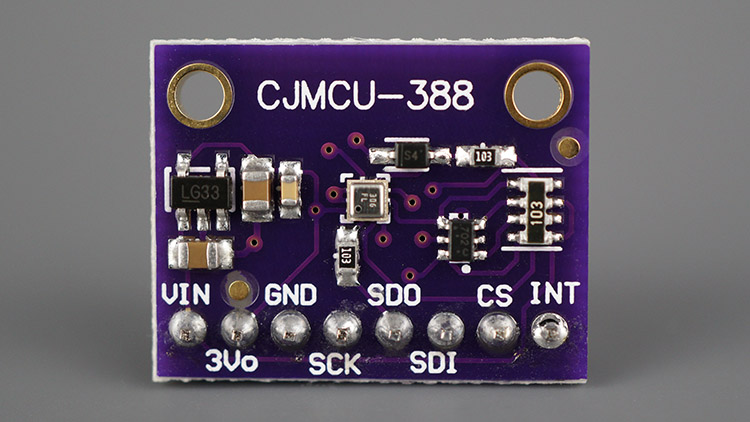
As you can see in the diagram below, BMP388 can be identified as a module.
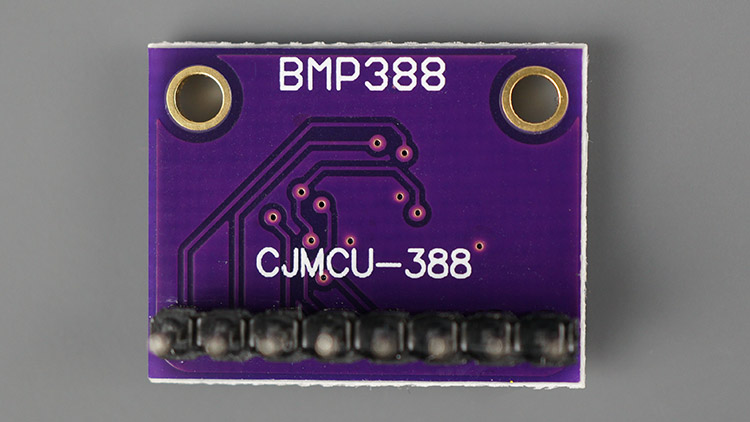
This is the other side of the sensor
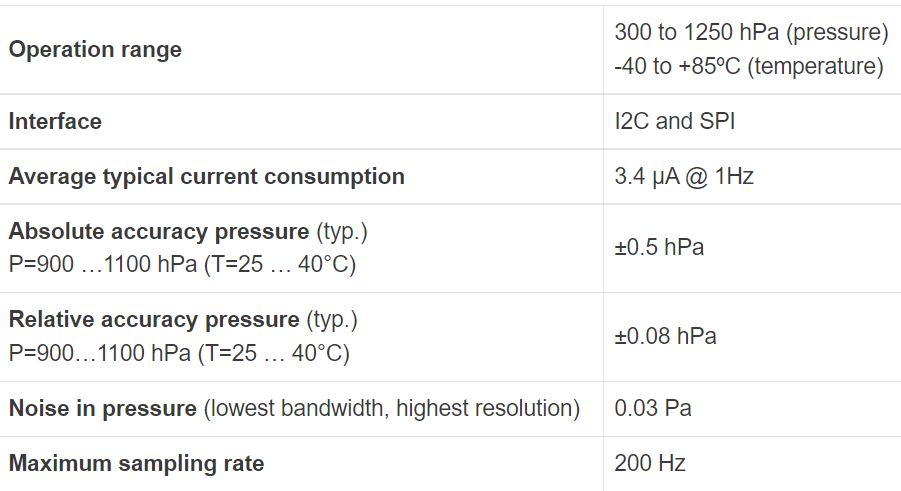
BMP388 technical data
The table below shows you the key features of the BMP388 sensor.
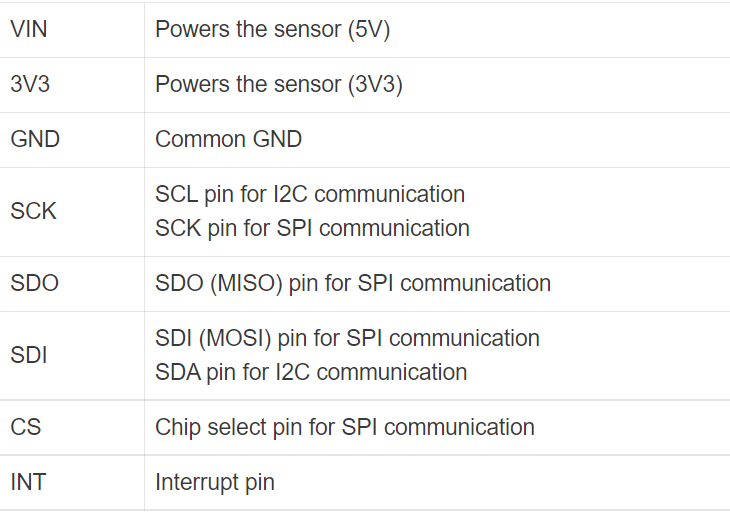
BMP388 pinout
The pinout used for the BMP388 module is given below. It may quite different from other modules.
BMP388 interface
As we highlighted before, the BMP388 sensor can use for both I2C and SPI interfaces.
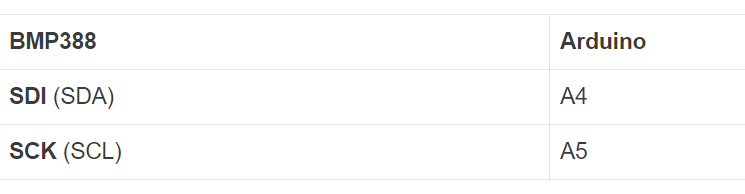
BMP388 I2C
If you are using the I2C communication protocol, we recommend for you use the pins given below (for the Arduino Uno- check I2C pins for other models)
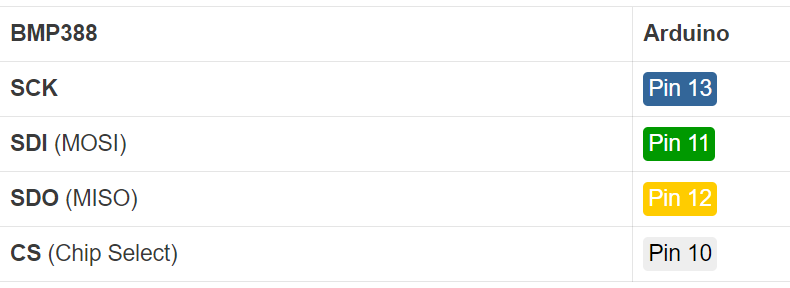
BMP388 SPI
Use the following pins to use the SPI protocol. (For the Arduino Uno- check I2C pins for other models)
Use the following parts
Take these parts to complete these guidelines.
- BMP388 sensor module
- Arduino board
- Bread board
- Jumper wires
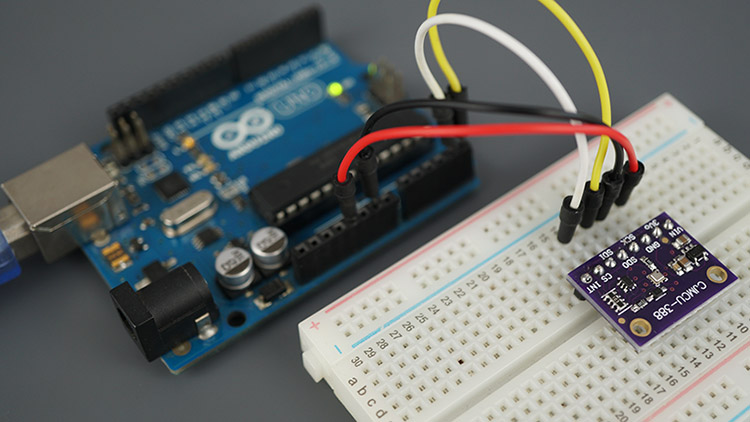
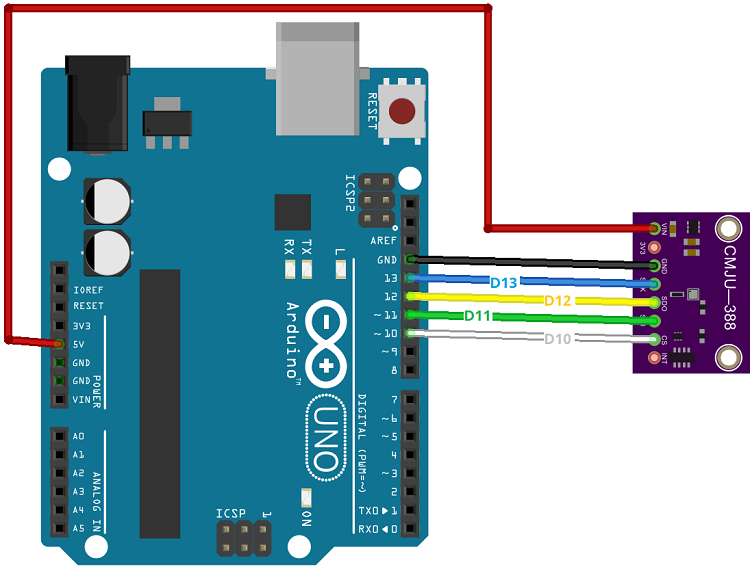
Schematic – Arduino including BMP388
BMP388 can communicate both with I2C and SPI communication protocols.
wire the BMP388 to the Arduino Uno using I2C pins.
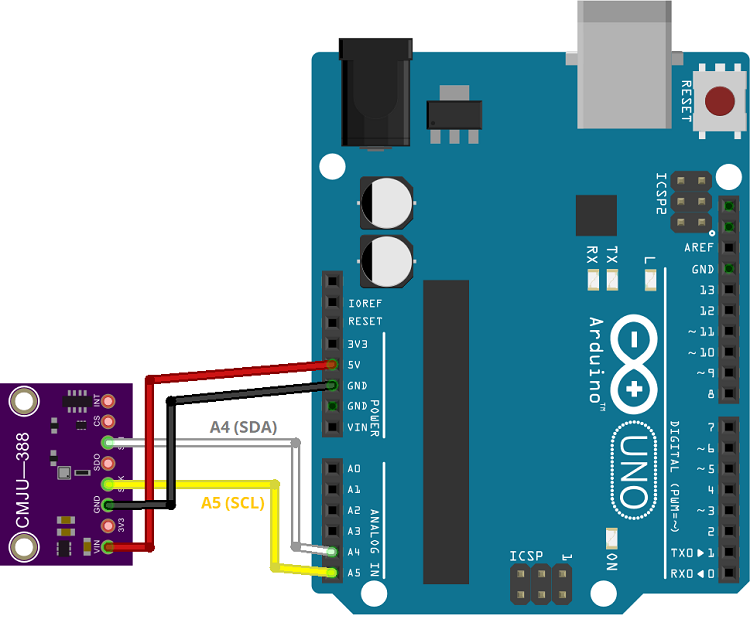
Look at the next schematic diagram to connect the BMP388 to the Arduino Uno using I2C pins.
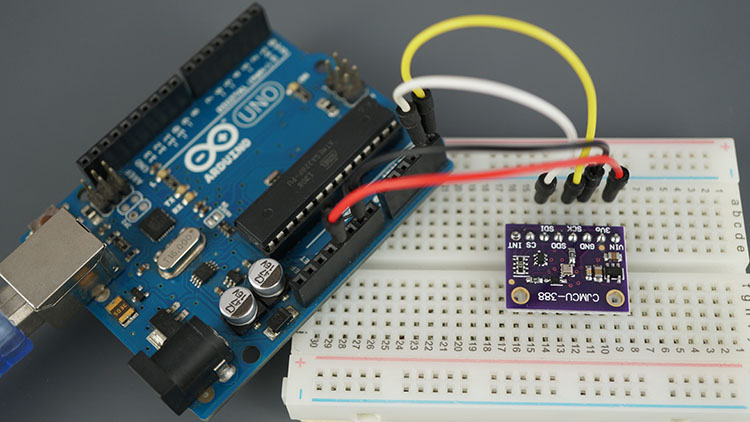
wire the BMP388 to the Arduino Uno using SPI
instead of using I2C if you want to use SPI communication protocol, see the next diagram to wire the BMP388 to the Arduino Uno using SPI pins.
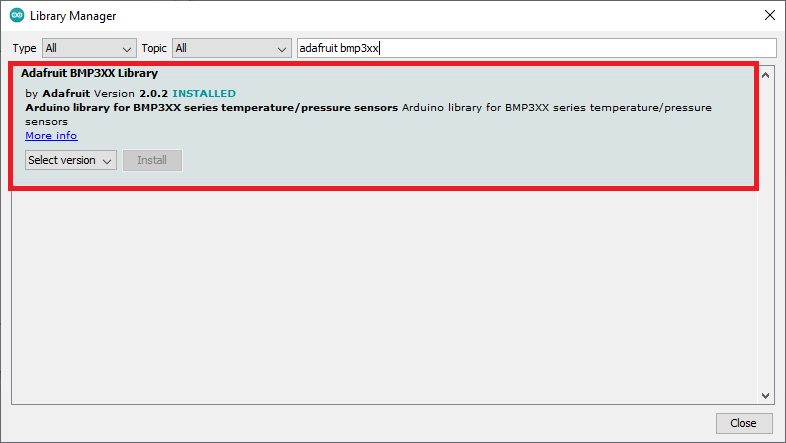
How to install the Adafruit BMP3XX library
You can find different libraries suit for the BMP388 sensor and Arduino. But in this tutorial, we use the Adafruit BMP3XX library.
Do the steps described below to install the library in your Arduino IDE.
Open the Arduino IDE. next go to sketch>include library>manage libraries. Then the library manager should open.
In the search bar search for “adafruit bmp3xx” and install the library.
Steps to install the Adafruit_Sensor library
You need to install the Adafruit_Sensor library t see the BMP3XX library.
The next step is to install the library for your Arduino IDE.
Go to sketch>include library>manage libraries and search in the search bar “Adafruit unified sensor”. Scroll down to find the library and install it.
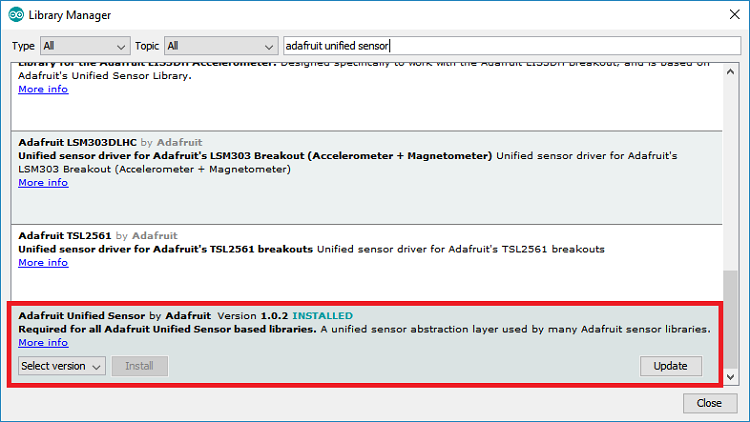
After that restart your Arduino IDE.
Coding part for reading BMP388 pressure, altitude, and temperature
To be more familiar with the new sensor start with a basic example given in the library.
When you installed the BMP3XX library, open the Arduino IDE and navigate to file>example>Adafruit BMP3XX library>bmp3XX_simletest. Then the code given below should appear.
Sea level pressure
To obtain the most accurate results for pressure and altitude, adjust your location sea level pressure in the SEALEVELPRESSURE_HPA variable.
The standard value for it is 1013.25hPa. to get the most accurate result check the sea level pressure of your location.
Follow these steps to code works
If you want to learn about the coding part, follow the steps below or move to the Demonstration part.
Required libraries
The code starts with the required libraries; the wire library for I2C, the SPI library (if you use SPI), the Adafruit_Sensor, and the Adafruit_BMP3XX libraries to work with the BMP388 sensor.
SPI communication
These coding parts are to use SPI instead of I2C. The below coding part defines the SPI pins.
Code to measure sea level pressure
The variable SEALEVELPRESSURE_HPA.
#define SEALEVELPRESSURE_HPA (1013.25)
This variable calculates and shows the pressure at the sea level in hectopascal (equal to millibar). This variable is to calculate the altitude for a given pressure while comparing it with the sea level pressure. The given example below is just an imaginary value, so to get an accurate calculation to use the current sea level pressure of your location. Check this website for the sea level pressure.
setup()
start the serial communication in the setup().
Serial.begin(115200);
Init BMP388 sensor I2C
We use the I2C communication protocol as the default one. This line starts an Adafuit_BMP3XX object named BMP on the I2C pin; A5 (SCL), A4(SDA).
If you want to use SPI, comment on the previous line and uncomment one of the following lines for hardware SPI(you can use default SI pins and choose the CS pin) or software SPI (use any pin you like)
//if (! bmp.begin_SPI(BMP_CS)) { // hardware SPI mode
//if (! bmp.begin_SPI(BMP_CS, BMP_SCK, BMP_MISO, BMP_MOSI)) { // software SPI mode
Use the below parameters (to do oversampling and filter) for the sensor.
// Set up oversampling and filter initialization bmp.setTemperatureOversampling(BMP3_OVERSAMPLING_8X); bmp.setPressureOversampling(BMP3_OVERSAMPLING_4X); bmp.setIIRFilterCoeff(BMP3_IIR_FILTER_COEFF_3); bmp.setOutputDataRate(BMP3_ODR_50_HZ);
For a better resolution of the raw sensor data, this helps to oversample. Here’s a default oversampling parameter, if you want you can use a different one.
- setTemperatureOversampling(): get temperature oversampling.
- setPressureOversampling(): get pressure oversampling.
The parameters given below can be used for these methods.
The use of the setIIRFilterCoeff() function can set the coefficient of the filter(in samples). Those function sets are:
You can use the setOutputDataRate() function to set the output data. You can use the following options.
Loop()
We use loop() to measure from the BMP388 sensor.
First, get the new readings with bmp.performReading().
After that find and print the temperature, pressure, and altitude readings as mentioned below.
Those specified readings are given below.
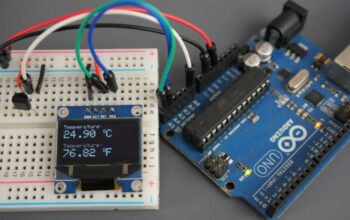
Final proof
After finding out the sea level pressure of your location enter it and upload the code to your board. To do that in your Arduino IDE, go to Tools>Boards> and choose the board you have, and then in Tools>Port choose the COM port.
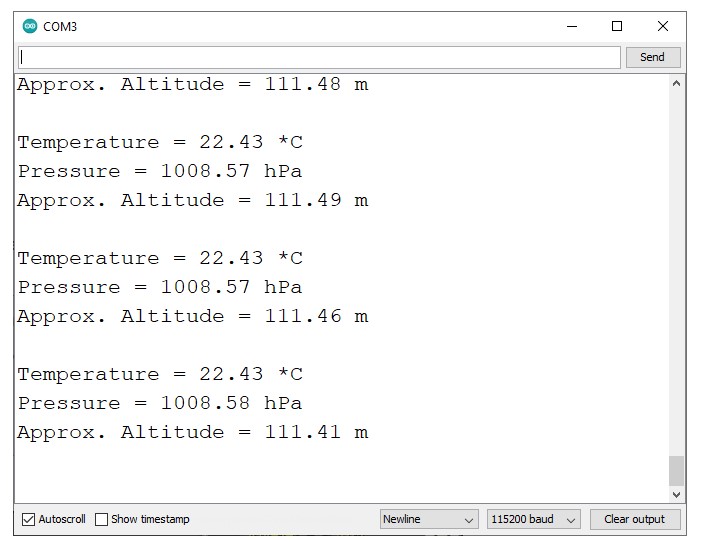
After uploading the code, open the serial monitor at a baud rate of 115200, so the reading will appear on the serial monitor.
If you change and increase the sensor’s altitude, it will be highlighted in the altitude reading. The altitude is always accurate so it can sense any slight change even in the centimeters or inches range. To check that compare the altitude you get with the altitude of your location.
Sum up
The BMP388 we learned today is a small very accurate pressure sensor that gives you the most accurate altitude. Not only altitude it can calculate the temperature. So this is really a perfect sensor to work for outdoor/indoor navigation, drone, weather station, and other applications.
So far you have learned so many things about how to use the sensor with the Arduino board through this tutorial. Hope this tutorial was a useful guide for you to know about BMP388 Altimeter with Arduino. Thank you for following this guide.
Frequently Asked Questions
What are the BMP388 Target Devices?
- Flying toys
- Watches
- Navigation systems
- Portable health care instruments
Who is the BMP388 Manufacturer?
Mechanical systems based sensing solutions are the focus of Bosch Sensortec. He was a technology explorer in the consumer electronics industry. The staff, which is motivated by passion, innovation, and adaptability, is the foundation of the success in sensors and solutions.
Reccomendations:
K-Type Thermocouple with MAX6675 Amplifier
How to measure TDS in ppm units with Arduino IDE