MPU-6050 Accelerometer and Gyroscope Sensors
In this guide, you can learn how to use the MPU-6050 accelerometer and gyroscope sensor module with the Arduino board. The MPU-6050 IMU the Inertial Measurement Unit is a 3-axle acceleration sensor and a 3-axle gyroscope sensor. The accelerometer counts the magnetic field accelerations, and the gyroscope counts the rotational velocity. Moreover, this model can be used to measure the temperature. This sensor is suitable for controlling the inclination of a moving object.
We are covering two examples in this guide.
- Receiving the gyroscope, acceleration, and temperature records in the Serial monitor.
- The gyroscope and acceleration sensor recodes on the Serial plotter.
- Showing the gyroscope and acceleration records on OLED display.
Introducing the MPU-6050 Gyroscope Accelerometer Sensor
The MPU-6050 is a course with a 3-axis accelerometer and a 3-axis gyroscope.
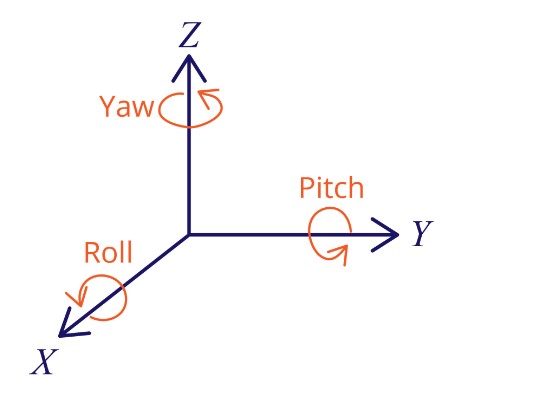
Using the gyroscope we can measure the rotational velocity (rad/s). This is the difference in the pointed position over time along the X, Y, and Z axis. (roll, pitch, and yaw). This helps us to calculate the orientation of an object.
The accelerometer counts the acceleration (rate of changing the velocity of the object.) It notices the stable forces such as gravity or vital forces like vibrations or movements. The MPU-6050 counts the acceleration over the X, Y, and Z-axis. Preferably, the Z-axis. It is equal to the gravitational force and it has to be zero on the X and Y axis.
By using the values of the accelerometers, you can calculate the roll and pitch angles using the calculations. Anyhow, it is unable to count the movements.
We can link the information using both sensors to have correct information about the sensor inclination.
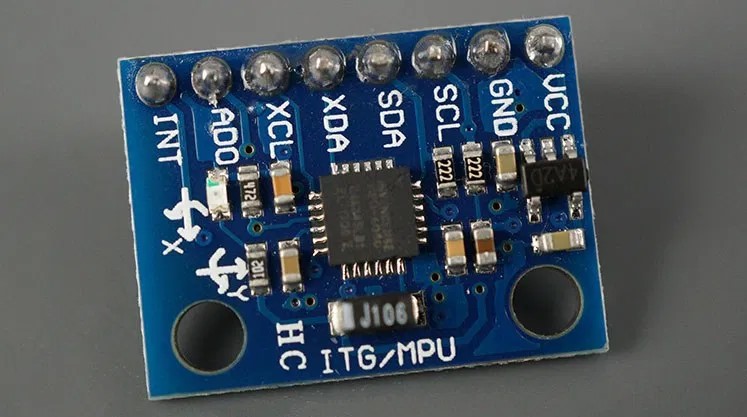
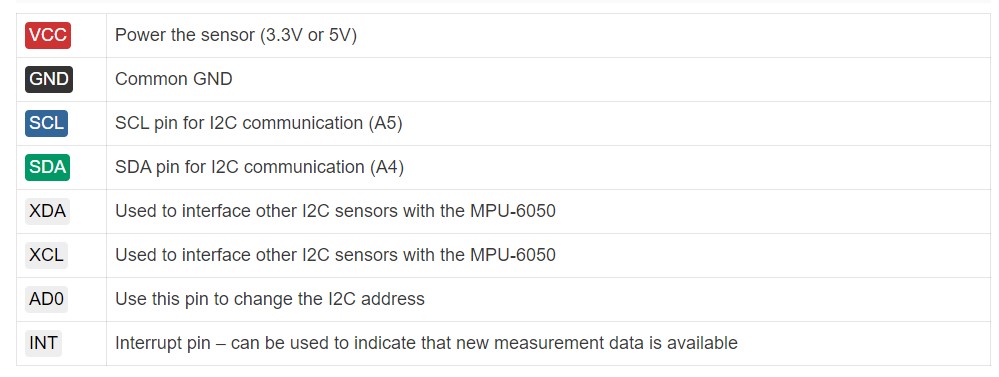
MPU-6050 Pinout
There is the pinout for the MPU-6050 sensor model.
Installing Libraries
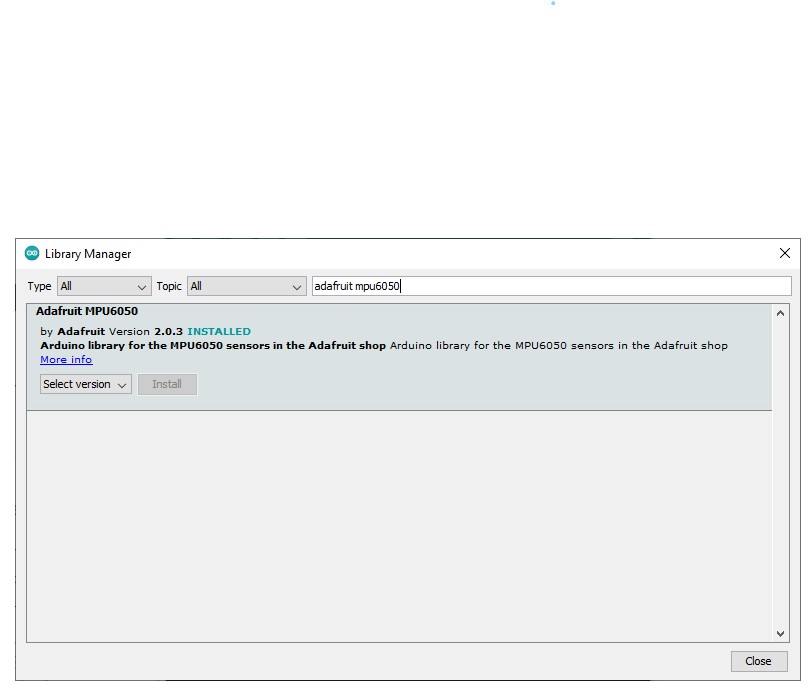
There are different methods to get the outputs from the sensors. In this guide, we are using the Adafruit MPU6050 library. For using this library, you have to install the Adafruit Unified Sensor library and the Adafruit Bus IO Library.
Go to the Arduino IDE and head to Sketch > Include Library > Manage Libraries. Then the Library Manager will open.
Type “adafruit mpu6050” in the search box and install the library
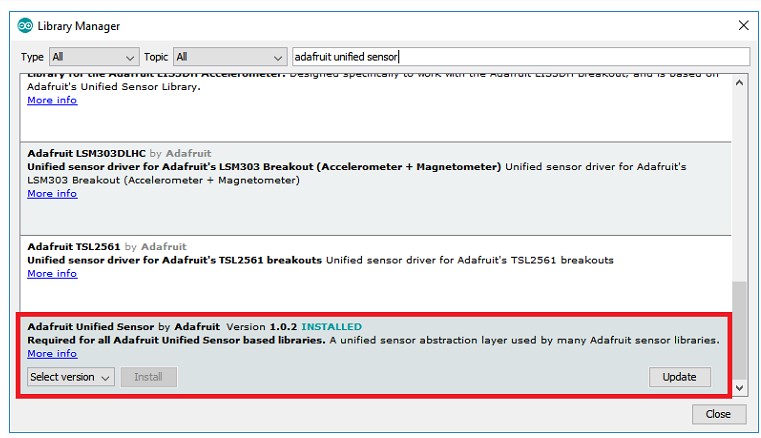
Next search “Adafruit Unified Sensor”. Go down and find the library and install it.
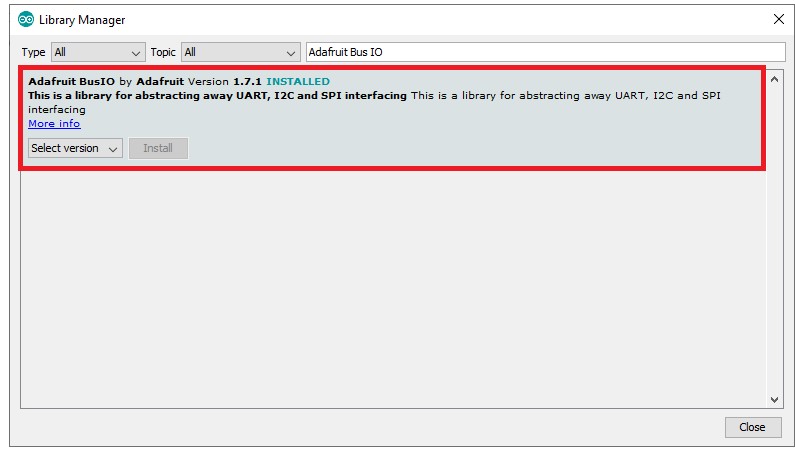
Finally search the “Adafruit Bus IO” and install.
After you have installed the libraries, restart the Arduino IDE.
Getting MPU-6050 Sensor Readings: Accelerometer, Gyroscope, and Temperature
In this part, you can learn how to have the sensor outputs from the MPU-6050 sensor. The acceleration (x, y, z), pointed velocity (x, y, z), and the temperature.
Parts Required
For the given sample you need to get the below parts.
- MPU-6050 Accelerometer Gyroscope
- Arduino (read Best Arduino Starter Kits)
- Breadboard
- Jumper wires
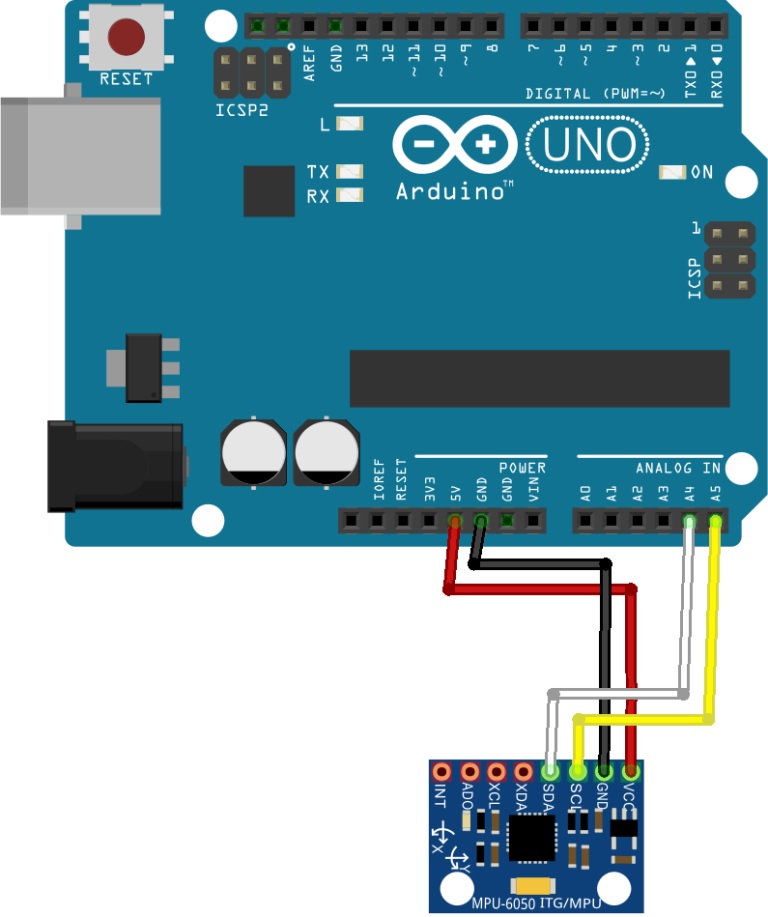
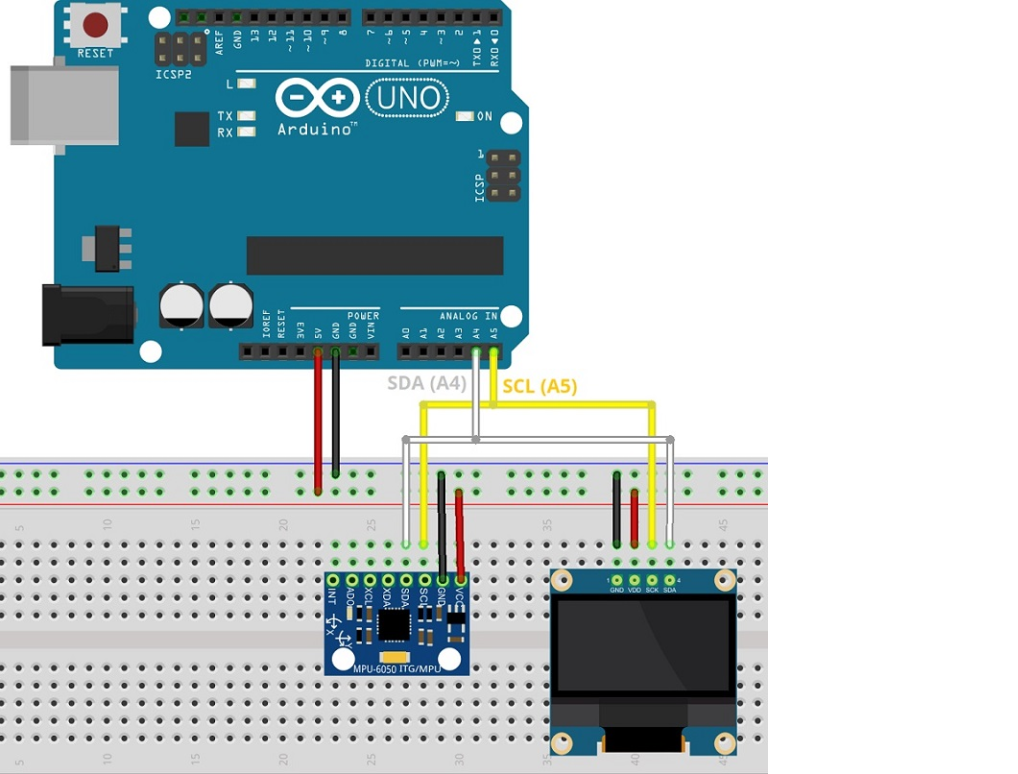
Schematic Diagram – Arduino with MPU-6050
Write the Arduino for the MPU-6050 sensor as you see in the below picture. Link the SCL pin to A5 and the SDA pin to A4.
Code – Getting MPU-6050 Sensor Readings: Accelerometer, Gyroscope, and Temperature
The Adafruit library gives some samples for this sensor. We are looking at some easy examples that print the Serial Monitor’s sensor outputs.
Head to File > Examples > Adafruit MPU6050 > basic_readings. Then the below code will be loaded.
It receives the angular velocity of the gyroscope on the x,y, and z-axis. And the acceleration on the x, y, and z-axis and the temperature.
How the Code Works
Start by entering the specific libraries for the MPU- 6050 sensors. Adafruit_MPU6050 and Adafruit_Sensor.
#include <Adafruit_MPU6050.h>
#include <Adafruit_Sensor.h>
Build up Adafruit_MPU6050 names as mpu to control the sensor.
Adafruit_MPU6050 mpu;
Setup()
In the setup() part format the serial monitor with a baud rate of 115200.
Serial.begin(115200);
Format the MPU-6050 sensor.
if (!mpu.begin()) {
Serial.println(“Sensor init failed”);
while (1)
yield();
}
Prepare the accelerometer measuring range.
mpu.setAccelerometerRange(MPU6050_RANGE_8_G);
Set the baud rate.
mpu.setGyroRange(MPU6050_RANGE_500_DEG);
Setting the bandwidth
mpu.setFilterBandwidth(MPU6050_BAND_5_HZ);
loop()
In the loop() we receive the sensor readings and show them in the Serial monitor.
First of all, get the new sensor events with exciting readings.
sensors_event_t a, g, temp;
mpu.getEvent(&a, &g, &temp);
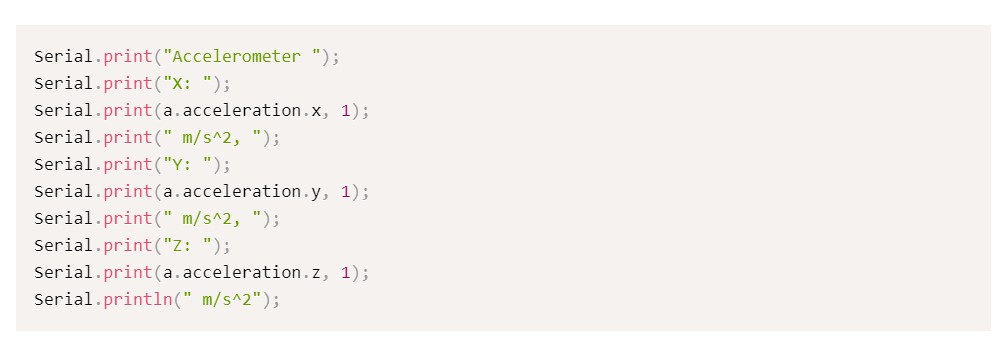
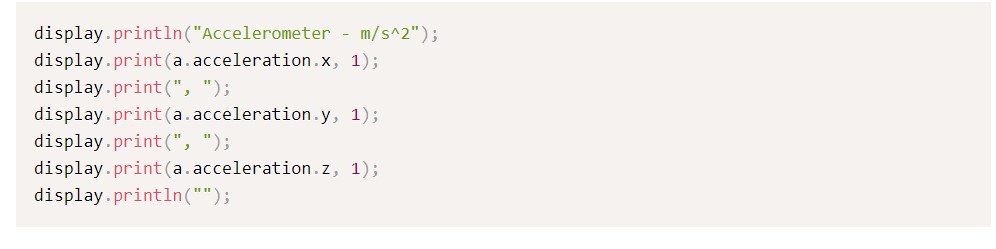
At last, print the readings. For the acceleration:
a.acceleration.x: gets acceleration on the x-axis;
a.acceleration.y: gets acceleration on the y axis;
a.acceleration.z: gets acceleration on the z-axis.
The acceleration is counted in meters per second square (m/s2)
Serial.print(“Acceleration X: “);
Serial.print(a.acceleration.x);
Serial.print(“, Y: “); Serial.print(a.acceleration.y);
Serial.print(“, Z: “);
Serial.print(a.acceleration.z);
Serial.println(” m/s^2″);
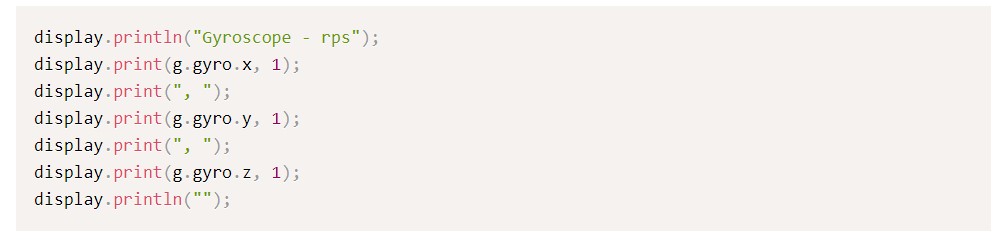
To have the gyroscope readings:
- g.gyro.x: gets angular velocity on the x-axis;
- g.gyro.y: gets angular velocity on the y axis;
- g.gyro.z: gets angular velocity on the z-axis.
We count the angular velocity in radians per second (rad/s).
Serial.print(“Rotation X: “);
Serial.print(g.gyro.x);
Serial.print(“, Y: “);
Serial.print(g.gyro.y);
Serial.print(“, Z: “);
Serial.print(g.gyro.z);
Serial.println(” rad/s”);
At last prin the temperature. Measured in Celsius degrees. To enter the temperature readings use temp. temperature.
Serial.print(“Temperature: “);
Serial.print(temp.temperature);
Serial.println(” degC”);
The new sensor readings appear every 500 milliseconds.
delay(500);
Demonstration
Include this code in the Arduino board.
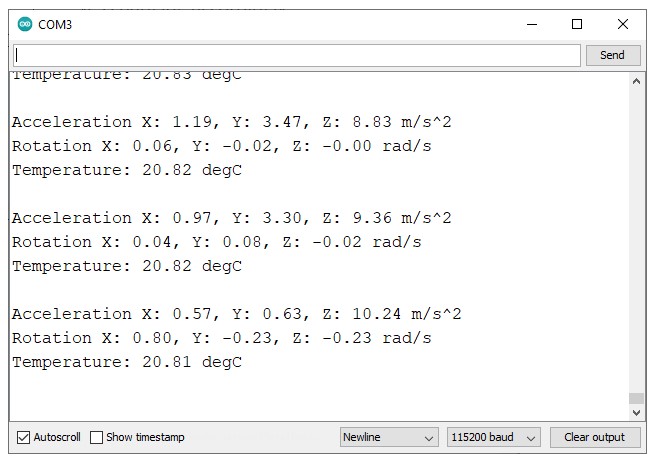
Then, open the serial monitor at a bandwidth of 115200, and press the onboard RST button. After that, you will be able to see the sensor measurements.
Change the sensor destinations and check the values changing according to that.
Sensor Calibration
Preferably when the sensor is stable, the gyroscope values will be zero on all the axis. On our occasion that does not happen. When the sensor is stable, below are the gyroscope values that we receive.
- x: 0.06 rad/s
- y: -0.02 rad/s
- z: 0.00 rad/s
In our practical sample, you have to consider the error and correct the values in the code to get more right outputs.
The same things take place in the acceleration values. The Z axis acceleration is nearer to the gravitational force (9,8 m/s2). And it has to be closer to the X and Y-axis. In this case, they are the estimated values that we get when the sensor is stable.
- x: 0.71 m/s2
- y: 0.28 m/s2
- z: 9.43 m/s2
Display MPU-6050 Readings on Serial Plotter
There are the same kinds of examples, but with some little difference to show the readings on the serial monitor.
The Adafruit MPU6050 library gives examples that show the MPU-6050 gyroscope and accelerometer outputs on an OLED screen.
Parts Required
Here are the parts you need to do in this example.
- MPU-6050 Accelerometer Gyroscope
- Arduino (read Best Arduino Starter Kits)
- 0.96 inch I2C OLED Display SSD1306
- Breadboard
- Jumper wires
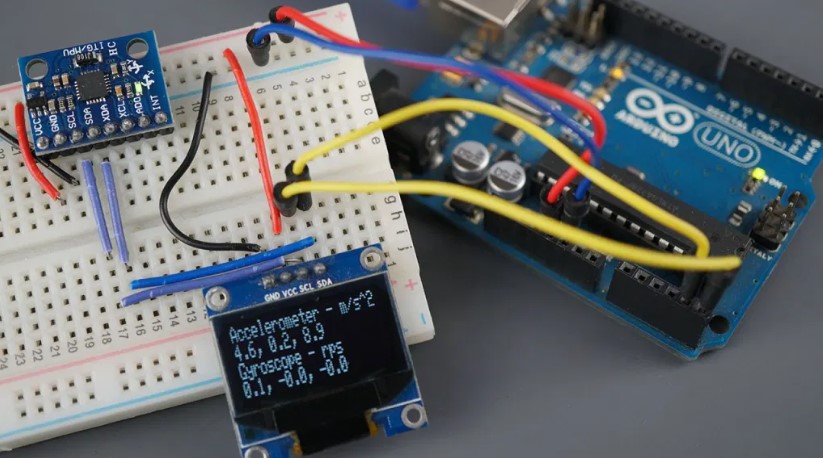
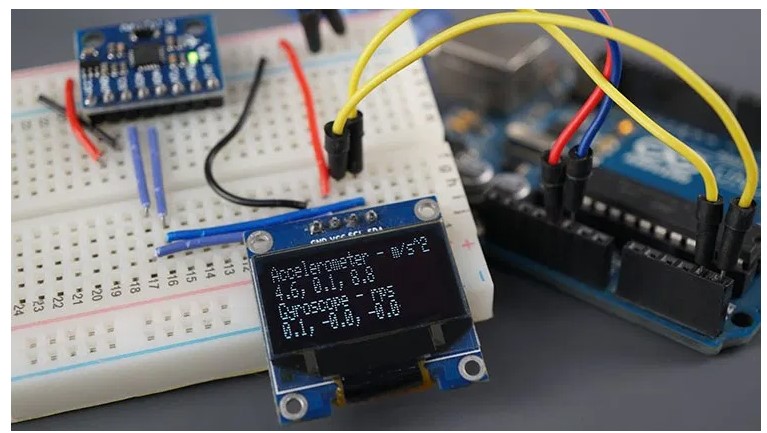
Schematic Diagram – Arduino with MPU-6050 and OLED Display
Link the all parts shown in the below picture. Because the OLED display and the MPU-6050 sensors is using different I2C addresses. They can be connected to the same 12c bus. The same pins are in the Arduino board.
Code – Display MPU-6050 Sensor Readings on OLED Display
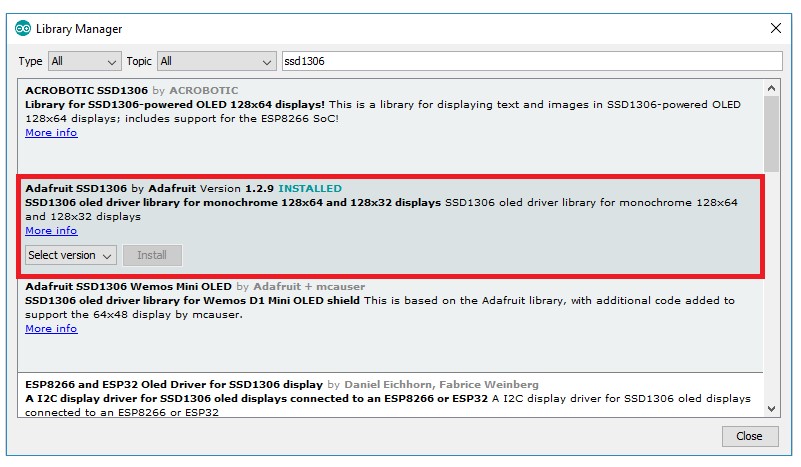
For using this example, you should have installed the Adafruit SSD1306 library. Download this library from the Arduino Library Manager.
Head to Sketch > Library > Manage Libraries and find the “SSD1306”. Next, install the SSD1306 library from Adafruit.
How the Code Works
First include the essential libraries for the MPU- 6050 sensors and the OLED display.
Make an Adafruit_MPU6050 object named mpu to control the sensor.
Adafruit_MPU6050 mpu;
Build up an Adafruit_SSD1306 object named display to control the OLED display. This is suitable for a display with 128×64 pixels.
setup()
In the setup() format the serial monitor at a bandwidth rate of 115200.
Serial.begin(115200);
Format the MPU-6050 sensor.
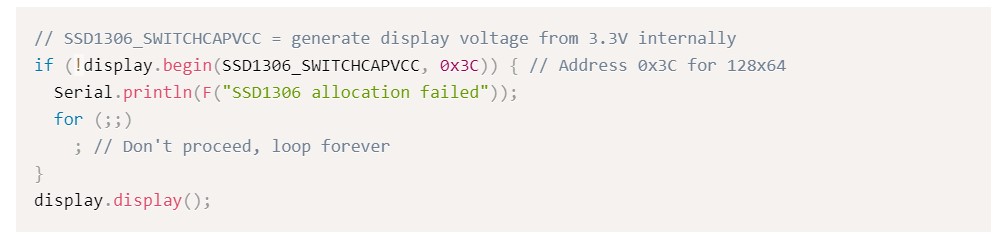
if (!mpu.begin()) {
Serial.println(“Sensor init failed”);
while (1) yield();
}
Format the OLED display.
Set the font size and the color in the display.
display.setTextSize(1);
display.setTextColor(WHITE);
display.setRotation(0);
loop()
In the loop() we get the sensor outputs and show them on the OLED.
Begin by building the measurements, accelerometer, gyroscope, and temperature
sensors_event_t a, g, temp;
Receive new sensor recordings.
mpu.getEvent(&a, &g, &temp);
Clean the display in the loop() to enter new readings.
display.clearDisplay();
Make the display cursor (0,0) in the upper left corner. It will write the texts from the location.
display.setCursor(0, 0);
The below lines print the acceleration sensor outputs in the serial monitor.
The below lines show the acceleration x, y, and z values on the OLED display.
Show the gyroscope outputs in the Serial monitor.
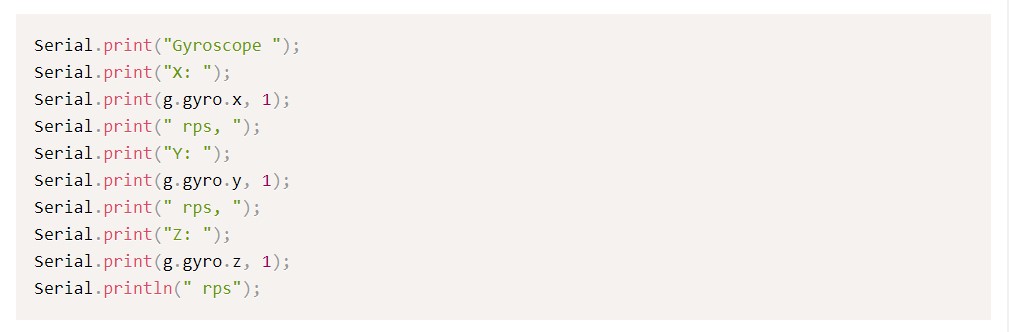
At last, print the gyroscope outputs on the serial monitor.
Finally, call the display. display() to display the outputs on the OLED.
display.display();
Now the new readings will appear every 100 milliseconds.
delay(100);
Demonstration
Put the code into the Arduino board,
Launch the Serial monitor at a bandwidth of 115200, and press the RST button on the board. The sensor measurements can be seen in both the serial monitor and the OLED display.

Move the sensor and see the changing values.

Wrapping Up
The MPU-6050 is an acceleration sensor and gyroscope. It counts the acceleration on the X, Y, and Z axis and also the angular velocity. And this can measure the temperature also.
This sensor model spreads via the communication protocols So it is not complicated to wire them. Just links the sensor to the Arduino 12C pins.
In this article, you have learned how to link the sensor and get the outputs. We think this will be useful for you.
Frequently asked questions
How to calibrate the MPU6050 accelerometer?
Place the accelerometer on a level surface, then take the average raw numbers and again remove them from the raw values while the accelerometer is working. In order to avoid having to calibrate every time you start up, you can store the accelerometer values in EEPROM.
How do combine accelerometer and gyroscope data?
The use of a sensor fusion method is like this. Through the use of sensor fusion techniques, information can be produced which are more accurate or has less uncertainty.
What is DMP in an accelerometer?
Digital Motion Processor. It keeps an internal buffer that combines information from the accelerometer and gyro to determine your orientation. You don’t need to keep records in your project code because the DMP also handles applying them.
Recommendations:
Arduino with BH1750 Ambient Light Sensor
Things to know about BMP388 Altimeter with Arduino
K-Type Thermocouple with MAX6675 Amplifier