Using BME680 Environmental Sensor with Arduino
The BME680 Environmental sensor is a digital climatic sensor that measures gas, pressure moisture, and temperature. In this article, you can learn how to use the BME680 sensor model with the Arduino board. The sensor links with the microcontroller using 12c or SPI communicating protocols.
You can study how to link the sensor to the Arduino board. Installing the specific libraries and using simple designs to show the sensor outputs in the Serial monitor.
Introducing BME680 Environmental Sensor Module

The BME680 is an atmospheric sensor that connects with gas, pressure, moisture, and temperature sensors. The gas sensor can record a wide range of gases like volatile organic compounds (VOC). Because of this, we can use the BME680 in the indoor air quality controller.
BME680 Measurements
The BME680 is a 4-in-1 digital sensor that checks
- Temperature
- Humidity
- Atmospheric pressure
- Gas: Volatile organic compounds(VOC) such as ethanol and carbon monoxide.
Gas Sensor
The BME680 has got a MOX (Metal-oxide) sensor that marks VOCs in the air. This sensor provides you with a contextual idea of the sum of VOCs/contaminants in the atmosphere. It is not specific for a specified particle.
MOX sensors are a collection of a metal oxide facest, a discerning chip to recognize the changes in conduction, and a heater. It checks VOCs by absorbing oxygen atoms on the sensitive layer. The BME680 reacts to many VOCs contaminated indoor air, not CO2.
When the sensor gets connected with the reducing gas, the oxygen atoms react and increase the resistivity of the surface. As a raw signal BME680 gives the resistance values. These values can be changed according to the differences in the VOC gatherings.

A higher concentration of the VOCs equals the lower resistance
A lower concentration of VOCs equals a Higher resistance.
The responses that happen on the sensor surface are affected by parameters other than VOC gatherings like temperature and humidity.
Relevant Information Regarding Gas Sensor
The gas sensor provides you a comparative idea of VOCs gasses in the nearby air. So you can obtain various modes, differentiate the results and check if the air conditioner is increasing or decreasing. To get the correct measurements, you have to adjust the sensor against the other sources and make up the right curve.
When you receive the sensor first, it is said to run it for 48 hours after gathering the “real” data. After the process, it is recommended to run the sensor for 30 minutes before getting gas records.
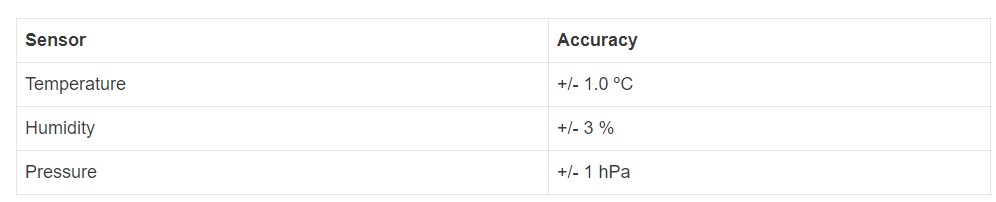
BME680 Accuracy
Here are the accurate temperature, moisture, and pressure sensors of the BME680:
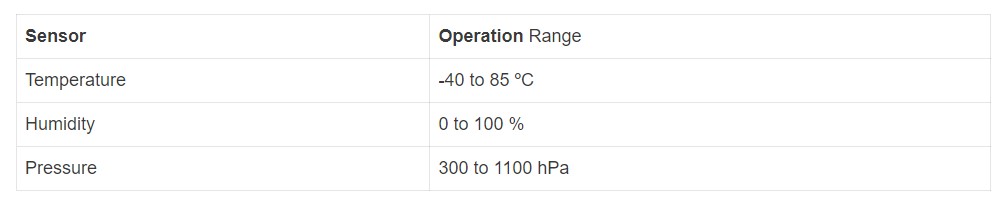
BME680 Operation Range
The below table gives you the performance range of the temperature, moisture, and pressure sensors for the BME680.
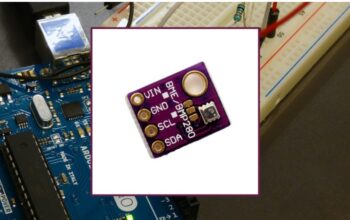
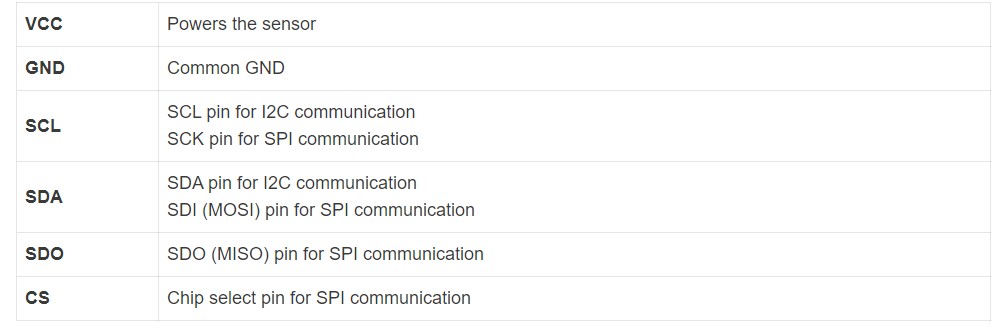
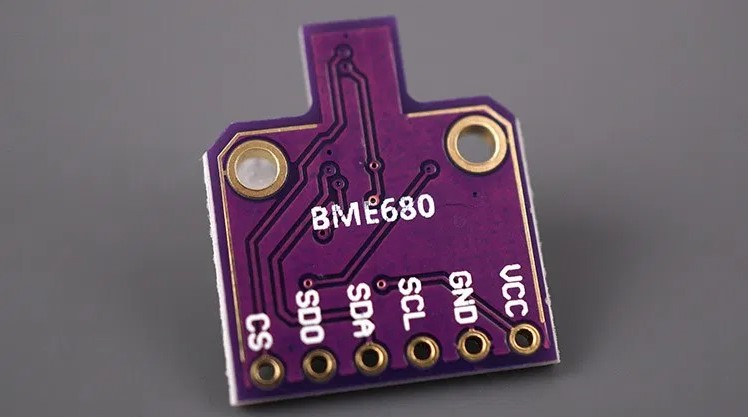
BME680 Pinout
This is the BME680 Pinout:
BME680 Interface
The BME680 assists the 12C and SPI interfaces.
BME680 I2C
For the usage of the 12C communication protocol, get the below-given pins.

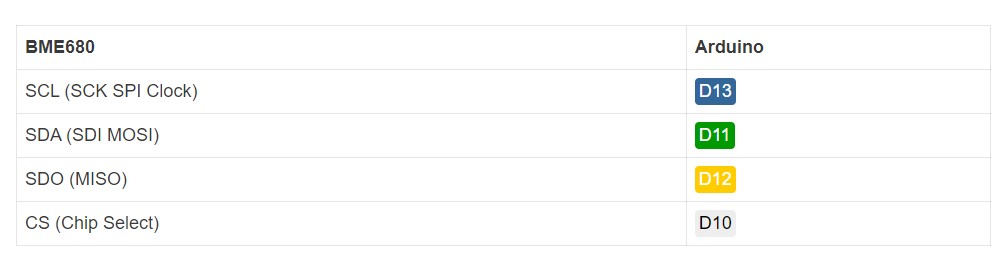
BME680 SPI
For using the SPI communication protocol, get the below pins.
Parts Required

Get the below-mentioned parts to complete the guide.
- BME680 sensor module
- Arduino Uno – read Best Arduino Starter Kits
- Breadboard
- Jumper wires
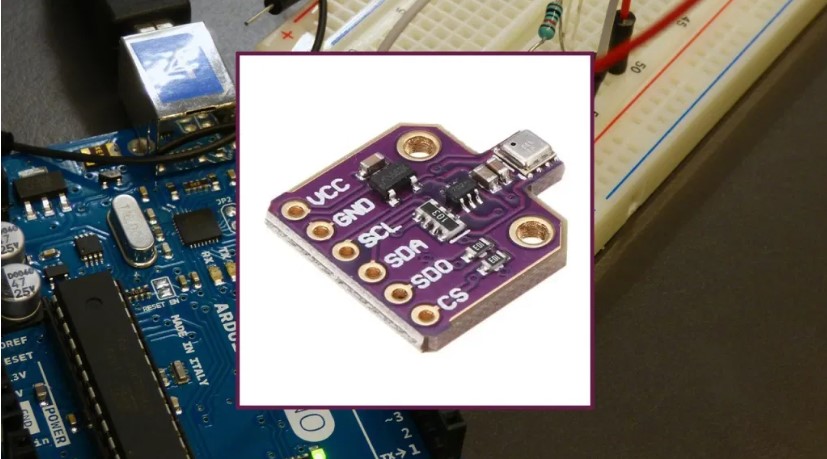
Schematic – Arduino with BME680
The BME680 is able to transmit using the 12C or SPI communication agreements.
Arduino with BME680 using I2C
Refer to the below picture to link the BME680 to the Arduino with the I2C pins.

Arduino with BME680 using SPI
On the other hand, you may need to use the SPI communication convention. On that occasion follow the given picture diagrams to link the BME680 to the Arduino with the SPI pins.

Installing the BME680 Library
To have the outputs from the BME680 sensor model, we are using the Adafruit_BME680 library. Follow the given steps to install the library on the Arduino IDE.
Open the Arduino and head to Sketch > Include Library > Manage Libraries. You have to open the Library Manager.
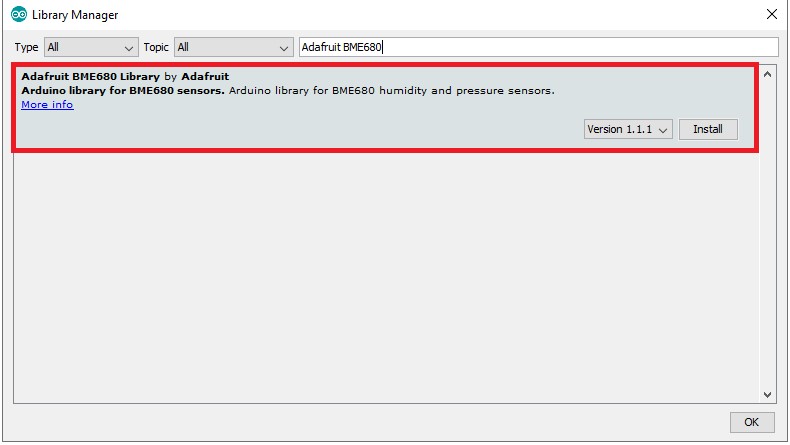
Search the “adafruit bme680 ” in your search box and install the library.,
Installing the Adafruit_Sensor Library
For using the BME680 library, install the Adafruit_Sensor library. Follow the further steps to install the library on the Arduino IDE.
Head to Sketch > Include Library > Manage Libraries and enter “Adafruit Unified Sensor” inside the search box. Go down and look for a specific library and install it.
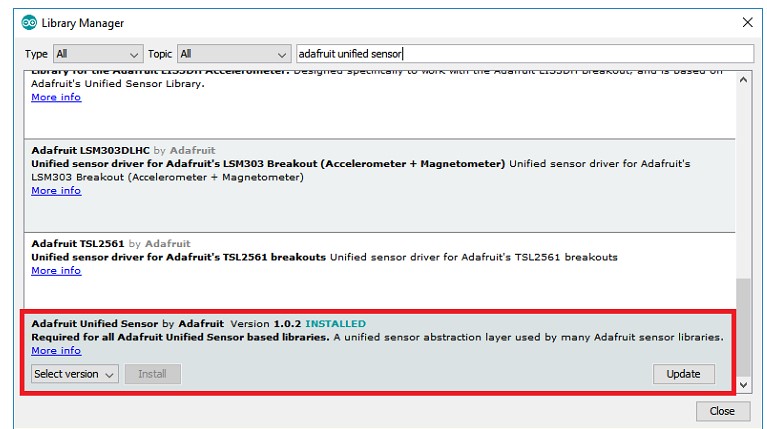
After the installation of the libraries, restart the Arduino IDE.
Code Arduino – Reading BME680 Gas, Pressure, Humidity, and Temperature
For reading the gas, force, temperature, and moisture we are using a rough example gained from the library.
After the installation of the BME680 library, and also the Adafruit_Sensor library, enter the Arduino IDE and head to File > Examples > Adafruit BME680 Library > bme680async.
How the Code Works
For that continue reading the rest of the article and You will get what you are looking for.
Libraries
The code begins by entering the necessary libraries. The wire library for the 12C, the SPI library (if the SPI is needed for the 12C) the Adafruit_Sensor, and the Adafruit_BME680 libraries to connect with the BME680 sensor.
#include <Wire.h>
#include <SPI.h>
#include <Adafruit_Sensor.h>
#include “Adafruit_BME680.h”
SPI communication
We normally use the 12C communication protocol with the sensor. Anyhow, the code is built up if you need to use SPI. You just have to remove the below lines in the code that conveys the SPI pins.
/*#define BME_SCK 13
#define BME_MISO 12
#define BME_MOSI 11
#define BME_CS 10*/
Sea level pressure
We make a variable called SEALEVELPRESSURE_HPA.
#define SEALEVELPRESSURE_HPA (1013.25)
This variable records the pressure of the sea level using hectopascal. It is similar to millibar. This variable is essential to rate the altitude of a particular force by contrasting it with the seal level pressure. The default value is used by this sample, but for the correct results, change the value with the available sea level pressure at your place.
I2C
By default, the example uses the 12C communication protocol. The given line makes an Adafruit_BME680 object named bme on the Arduino 12C pins. D5 (SCL), D4 (SDA).
Adafruit_BME680 bme; // I2C
For using the SPI you should input the earlier line and remove the below line.
//Adafruit_BME680 bme(BME_CS, BME_MOSI, BME_MISO, BME_SCK); // software SPI
setup()
Begin a serial communication in the setup() part.
Serial.begin(115200);
Init BME680 Sensor
Format the BME680 sensor:
if (!bme.begin()) {
Serial.println(F(“Could not find a valid BME680 sensor, check wiring!”));
while (1);
}
Prepare the below frameworks (sampling, filtering, and gas heater) for the sensor.
// Set up oversampling and filter initialization bme.setTemperatureOversampling(BME680_OS_8X); bme.setHumidityOversampling(BME680_OS_2X); bme.setPressureOversampling(BME680_OS_4X); bme.setIIRFilterSize(BME680_FILTER_SIZE_3); bme.setGasHeater(320, 150); // 320*C for 150 ms
Increasing the raw sensor data helps to do oversampling. We are using the default sampling parameters. However, you have the chance to change them.
- setTemperatureOversampling(): set temperature oversampling.
- setHumidityOversampling(): set humidity oversampling.
- setPressureOversampling(): set pressure oversampling.
The methods accept any of the below parameters.
- BME680_OS_NONE: turn off reading;
- BME680_OS_1X
- BME680_OS_2X
- BME680_OS_4X
- BME680_OS_8X
- BME680_OS_16X
The BME680 sensor unites an internal filter to decrease the short-time changes in sensor output recodes made by external distractions. The setIIRFilterSize() method places the IIR filter. It obtains the filter size as a parameter.
- BME680_FILTER_SIZE_0 (no filtering)
- BME680_FILTER_SIZE_1
- BME680_FILTER_SIZE_3
- BME680_FILTER_SIZE_7
- BME680_FILTER_SIZE_15
- BME680_FILTER_SIZE_31
- BME680_FILTER_SIZE_63
- BME680_FILTER_SIZE_127
The gas sensor combines a heater. Fix the heater menu using the setGasHeater() method that receives the arguments.
- The heating temperature shows in degrees Centigrade.
- The time heater makes on in milliseconds.
We are using the default settings: 320 ºC for 150 ms.
loop()
In loop() we remove the measurements from the BME680 sensor.
First of all, command the sensor to begin the asynchronous reading with bme.beginReading(). This gives back the time when the reading gets ready.
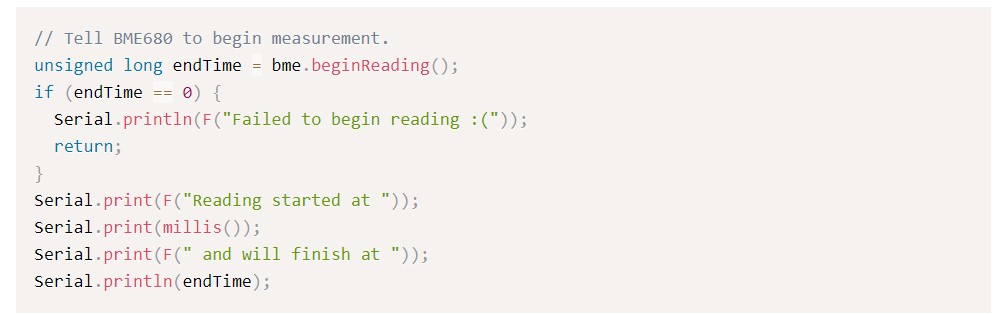
Next call the endReading() option to finish the asynchronous reading. If the asynchronous reading is still continuing block it till it is ending.
if (!bme.endReading()) {
Serial.println(F(“Failed to complete reading :(“));
return;
}
After that, we get the readings given below.
- bme.temperature: output temperature reading
- bme.pressure: output pressure recodes.
- bme.humidity: outputs the humidity recodes.
- bme.gas_resistance: outputs the gas resistance.
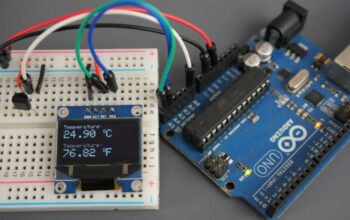
Demonstration
Put the code into the Arduino board. Head to Tools >Board and choose the Arduino board you are using. Head to Tools > Port and take the port that is linked to your board. Next, press the upload button.
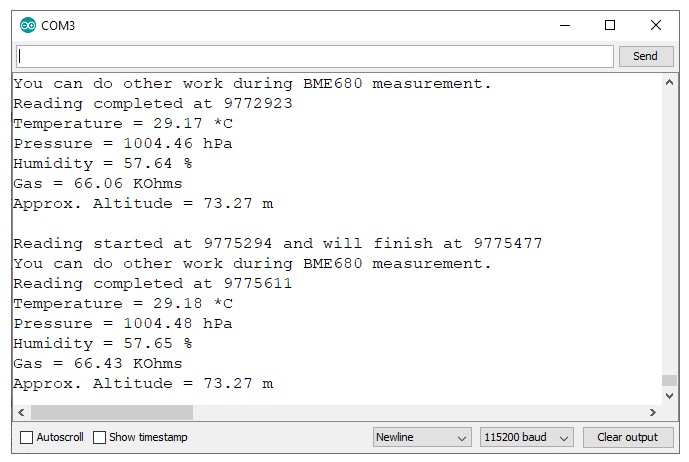
Launch the Serial monitor at a bandwidth rate of 115200, Press and keep holding the RST button. Then you can see the sensor measurements.
Wrapping Up
The BME680 sensor model is a 4-in-1 digital sensor that links the gas, pressure, temperature, and moisture sensors. The BME680 includes a MOX sensor that feels available for many VOC gases. This sensor provides you with a contextual idea of the sum of VOCs/impurities in the surrounding air. Because of this, the BME680 can be taken to check the indoor air quality.
Finally, We hope this guide will be important for you.
Frequently Asked Questions
What gases does Environmental Sensor BME680 identify?
With the addition of a tiny MOX sensor, the BME680 advances the capabilities of those sensors. To recognize gases and alcohols like ethanol, alcohol, and carbon monoxide and to check the quality of the air, heated metal oxide changes resistance dependent on the volatile organic compounds (VOC) in the air.
What is a VOC sensor?
The small changes in a few gases are programmed into VOC sensors, which then transmit the information to a central monitoring system. These detectors are used by plant staff to track and stop any unforeseen increases in the outflow.
What are environmental sensors in Android?
Four sensors are available on the Android platform, which let you keep an eye on different environmental factors. These sensors can be used to keep an eye on the relative humidity, light, pressure, and temperature in the area of an Android-powered device.
Recommendations:
Arduino Guide for MPU-6050 Accelerometer and Gyroscope Sensors
Complete Guide for Ultrasonic Sensors HC-SR04 with Arduino
Arduino with BH1750 Ambient Light Sensor